

Article Content
What you'll learn in my video above
Hi Friends, Makeup Artist Katie here...![]()
I’ll let you in on a little secret… I’m a bit of a brow fanatic!
Today, I'm sharing my 3-step brow technique that will show you how to sculpt your own perfect brow shape to compliment your facial proportions! 💗
Follow my step-by-step guide below for all my pro makeup artist tips & tricks for perfected brows...
First, brush your brow! ✨
Brushing ensures that your brow is in the perfect shape before any "filling" happens!
Using a spoolie, simply brush the hairs upwards, and then using the tip of the spoolie, tame any stray hairs down from above your brow.

Top Tip!
If you don’t own an eyebrow spoolie, you could use an old (but clean!) mascara wand.
Next, find your individual brow shape 🔍
To do this, simply hold an eyebrow pencil from the corner of your nostril, in a vertical line, up to your inner eye.
Where the pencil hits your brow line is where your ideal eyebrow shape should start! 🌟

Use the eyebrow pencil to mark this spot (where your brow should start) to create an easy-to-follow guide tailored to you!
To find the highest part of your brow arch, align the pencil from the corner of your nostril diagonally across your pupil.
The point where the pencil hits the brow bone is ideal for the highest part of your brow arch.
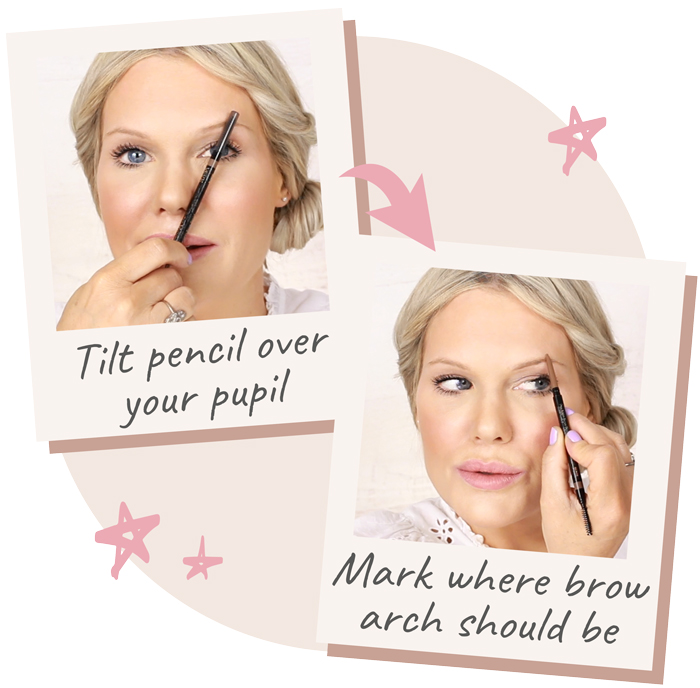
Once again, mark this spot using your eyebrow pencil.
Your brow arch will help frame your eyes and create an instant, natural eye-lift! 🤩
To find where your brow should end for your face shape, hold the pencil from the corner of your nostril diagonally to the outer corner of your eye.
The diagonal pencil will show you the perfect point for your brow to end.
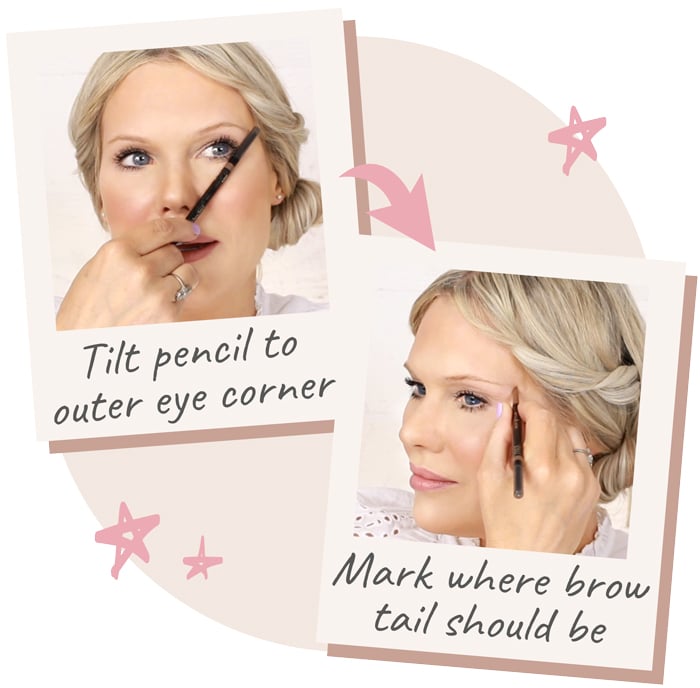
Mark this point with a final dot – and you now have an easy guide to create your perfect brow shape! 👏
Top Tip!
If you accidentally misplace any dots, don’t worry! 😅
Use the spoolie to blend in colour or use a Q tip to wipe the marks away gently.
Once you've finished mapping out your perfect brow shape, it’s time to start filling!
Using your eyebrow pencil, start at the base of your brow, and draw small, hair-like strokes up to the arch of your brow.

If your brow hair doesn't start at the same point as your first guide mark, gently feather in a few hairs to mimic the look of fuller brows.
Top Tip!
To make your brow appear softer at the start, blend with the spoolie - it helps it look more realistic 🥰
Once you've enhanced the base of your brow, start building the density by drawing hairs IN the arch.
Draw up until you meet your second guide mark, at the top arch of your brow.

Then, continue feathering strokes down from your brow arch, to meet your final guide mark, at the tail of your brow.
Top Tip!
Use your pinky finger as a stabiliser for a steady hand & a lighter touch to gradually build colour!

Ta-daah! The perfect brow shape customised to your facial structure! 🥰
I want to share one last tip with you and introduce my brow 'holy grail'...
The ultra-slim pencil makes it so easy to create defined, natural-looking brows...
...whilst the clear setting gel holds the hairs in place all day long (giving an extra oomph to your newly transformed brows)!
This brow duo is the final helping hand you need to shape your brows like a pro 👏

Remember, our faces are slightly asymmetrical, so your brows are wholly expected to look like “sisters, not twins”…
...just have fun discovering the eyebrows you like the most! 💖
Love,